Contracts
The Contracts feature in Olqan allows users to create, manage, and track contracts efficiently. It streamlines contract administration by integrating project and client details, ensuring all necessary information is in one place.
Creating a Contract
To create a contract:
- Navigate to Project Management > Contracts
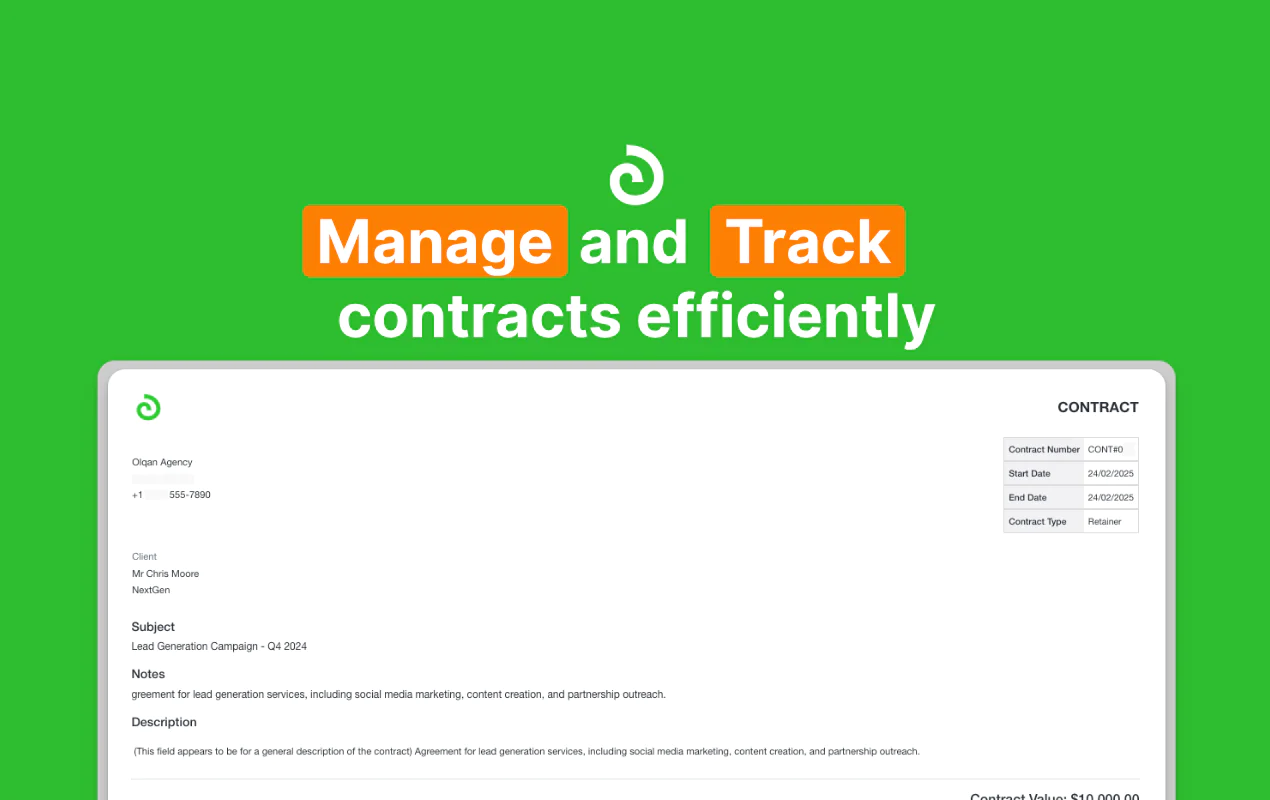
Click on the Create Contract button. - Enter Contract Details
- Contract Number: Auto-generated but can be edited.
- Subject: Specify the purpose or title of the contract.
- Project: Select the associated project from the dropdown list.
- Description: Provide an overview or details about the contract’s purpose and scope.
- Set Contract Timeline
- Start Date: Select the start date of the contract.
- End Date: Specify the end date or check Without Due Date if it’s an open-ended contract.
- Define Financial Details
- Contract Value: Enter the total value of the contract.
- Currency: Choose the currency for the contract value.
- Select Contract Type
- Choose from existing contract types or add a new one using the Add button.
Adding Client Details
- Link to a Client
- Client: Select the client associated with the contract. If the client is not listed, add a new client using the Add button.
- Input Client Contact Information
- Call: Enter the primary contact number.
- Office Phone Number: Include the office contact for official communication.
- Alternate Address: If necessary, provide an alternate address for correspondence.
- Notes: Add any additional notes relevant to the client or contract.
Finalizing and Saving
- Review the Information
Ensure all mandatory fields are filled out accurately. - Click Save
Save the contract to store it in the system. The new contract will appear in the Contracts list view. - Manage Contracts
- Contracts can be edited or updated from the Contracts list by clicking on the corresponding Action button.
- Users can also Export contract details in Excel format for record-keeping or analysis.
The Contracts feature in Olqan ensures organized and efficient management of contractual agreements, integrating seamlessly with project and client data for streamlined operations.
Contract Template
The Contract Template feature in Olqan allows users to create reusable contract templates that streamline the process of generating contracts for various projects and clients.
Creating a Contract Template
- Navigate to Contract Template:
- Go to Project Management and select Contract Template.
- Add Contract Template:
- Click on the green Add Contract Template button.
- Fill in Contract Details:
- Subject: Enter the title of the contract template.
- Description: Provide a detailed description of the contract’s terms and conditions using the rich text editor.
- Contract Type: Select the type of contract (e.g., Fixed Price, Hourly, Retainer) or add a new contract type by clicking on Add.
- Contract Value: Enter the estimated value for the contract template.
- Currency: Choose the currency for the contract value from the dropdown menu.
- Save the Template:
- Click Save to create the contract template.
- The template will now be available in the Contract Template list and can be used when creating new contracts.
Managing Contract Templates
- Search and Filter:
- Use the search bar at the top to find specific templates by name or subject.
- Filter templates based on contract type or other relevant criteria.
- Edit or Delete:
- In the Action column, click on the three dots to Edit or Delete a template.
- Modifying a template allows users to update the terms and conditions or any other details.
- Using Templates in Contracts:
- When creating a new contract, select the relevant contract template from the list.
- The selected template’s details will automatically populate the new contract form, ensuring consistency and saving time.
This feature enhances efficiency by allowing organizations to standardize their contracts and reuse templates for similar projects or clients.
Project
The Projects feature under Project Management in Olqan allows users to effectively organize, manage, and track projects. It provides a comprehensive view of all projects, their progress, and relevant details, ensuring streamlined project management.
Viewing Projects
- Navigate to Project Management > Projects to see a list of all ongoing and completed projects.
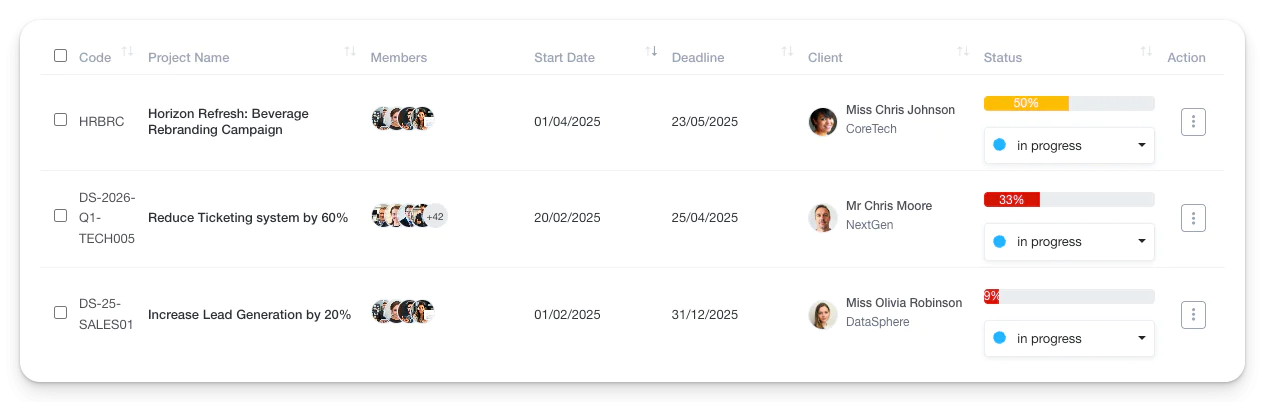
- The project list displays essential details such as:
- Code: Unique identifier for each project.
- Project Name: Title of the project.
- Members: Team members assigned to the project.
- Start Date: When the project commenced.
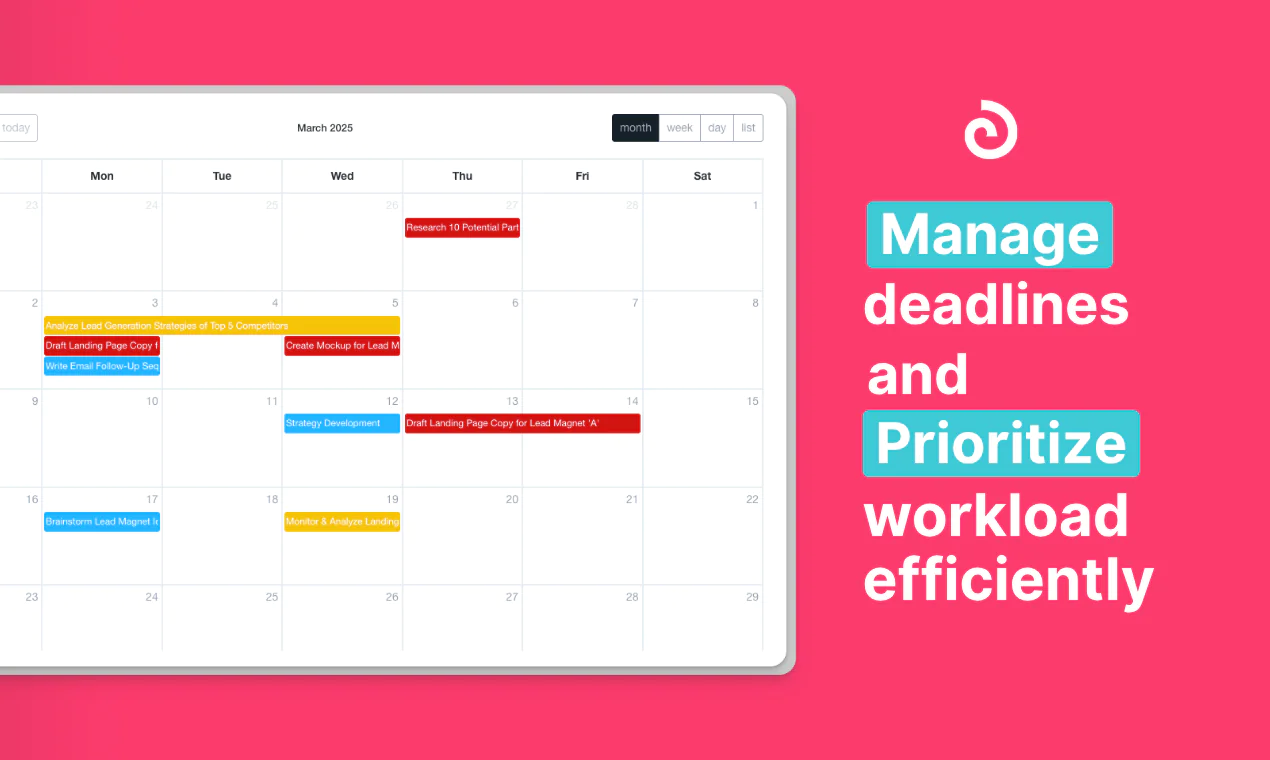
- Deadline: Expected completion date.
- Client: The client associated with the project.
- Status: Current status (e.g., In Progress, Completed).
- Users can filter projects by:
- Duration: Start Date to End Date.
- Status: In Progress, Completed, etc.
- Progress: Percentage of project completion.
- Client and Contract Type: Narrow down projects related to specific clients or contract types.
- The view can be customized using different display options, including List View and Grid View.
Adding a New Project
- Click “Add Project” at the top of the project list to create a new project.
- Fill in Project Details:
- Short Code: Unique identifier for the project.
- Project Name: Name of the project.
- Start Date and Deadline: Timeline of the project.
- Project Category: Select or add a new category for better organization.
- Department: Assign the project to a specific department.
- Client: Link the project to an existing client.
- Project Summary and Notes: Detailed description and additional notes.
- Configure Additional Settings:
- Public Gantt Chart: Enable or disable visibility of the project timeline.
- Public Task Board: Allow team members to track tasks visually.
- Task Approval: Specify if tasks require approval by Admin or Project Admin.
- Add Project Members:
- Select team members who will be part of the project.
- This ensures only relevant personnel have access to project details and tasks.
- Other Details:
- Click on Other Details to add additional information as required.
- Click “Save” to finalize the creation of the new project.