Invoices
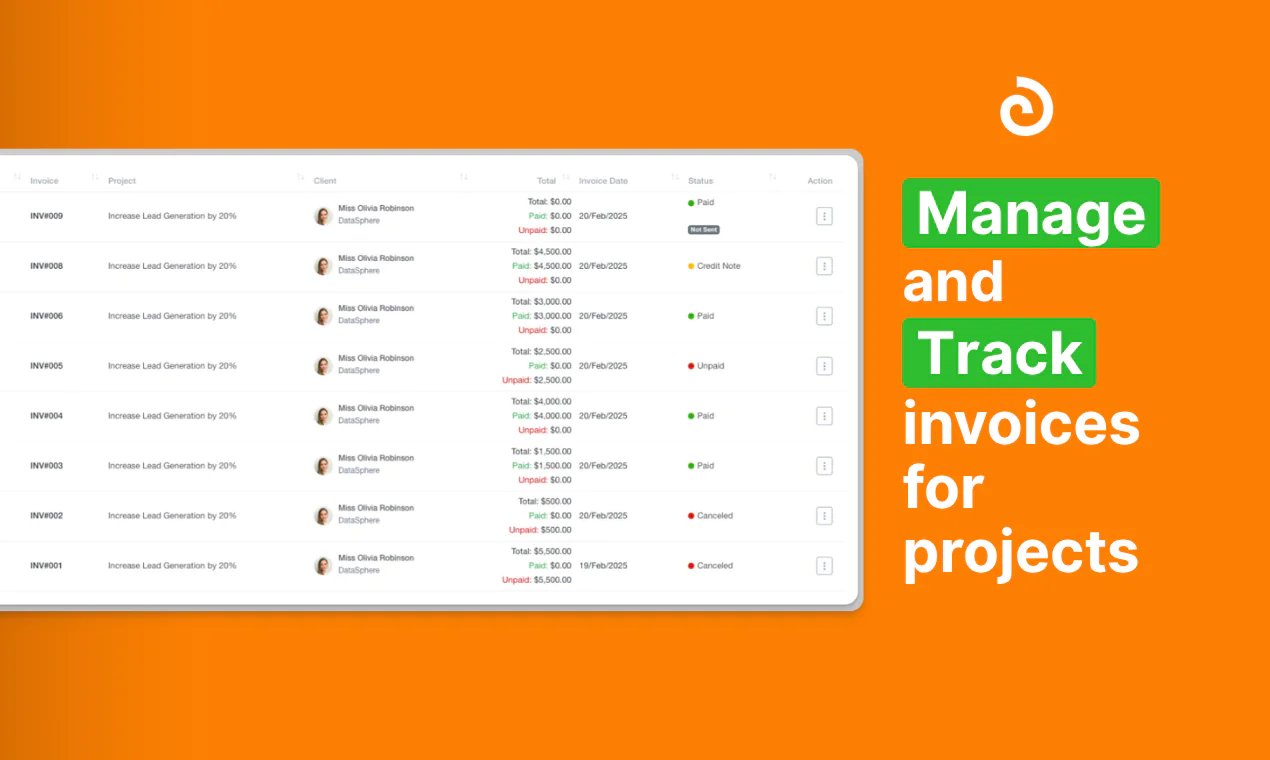
The Invoices section allows users to generate, manage, and track invoices for projects, time logs, and recurring payments. This section includes options for creating standard invoices, recurring invoices, and invoices based on time logs. Users can also filter, export, and monitor payment statuses.
1. Viewing Invoices
Navigate to Finance > Invoices.
The invoice dashboard displays a list of invoices, including:
- Invoice Number
- Project
- Client
- Total Amount
- Invoice Date
- Status (Unpaid, Paid, Pending, Canceled, etc.)
Use the Filters panel to sort invoices by:
- Project
- Client
- Invoice Status (All, Pending, Unpaid, Paid, Partial, Canceled, Pending Confirmation)
Click on an invoice to view or take further action
2. Creating a New Invoice
Click Create Invoice on the invoices dashboard.
Fill in the Invoice Details:
- Invoice Number (Auto-generated or manually entered)
- Invoice Date & Due Date
- Client & Project
- Bank Account & Payment Details
- Billing & Shipping Address
- Exchange Rate & Tax Calculation
Add invoice line items:
- Click Add Item to input a description, quantity, unit price, and applicable taxes.
Optional:
- Attach supporting files by clicking Choose a file
- Add Notes for the recipient
- Specify Terms and Conditions
Click Save to finalize the invoice or Save as Draft to edit later.
3. Creating Recurring Invoices
Click Recurring Invoice from the invoice dashboard.
Fill in:
- Client & Project
- Billing Frequency (Daily, Weekly, Monthly, etc.)
- Start Date & Number of Billing Cycles
- Invoice Items (Description, Quantity, Unit Price, Tax)
Review the Next Invoice Date details.
Click Save to enable automatic invoicing.
4. Creating a TimeLog Invoice
Click Create TimeLog Invoice on the invoices dashboard.
Enter the required details:
- Invoice Number
- Project & Client
- Currency & Exchange Rate
- Time Log Duration (Start & End Date)
Add time log-based billing details, ensuring accuracy in hours and rates.
Click Save to generate the invoice.
5. Managing Invoice Payments
View payment status in the invoice list:
- Paid: Invoice is fully settled.
- Unpaid: No payment received.
- Partial: Partial payment recorded.
- Canceled: Invoice is voided.
Click on an invoice and mark it as Paid if payment has been received.
This section helps streamline invoice creation, automate recurring payments, and track outstanding balances efficiently.
Payments
Viewing Payments
The Payments section provides a structured view of all recorded payments. Users can track payments linked to specific invoices, projects, and clients. The interface allows filtering payments based on date, client, and project, making it easy to locate relevant transactions.
- Navigate to Finance > Payments to access the payments list.
- The table displays key details such as Invoice Number, Project, Client, Amount Paid, Payment Date, Payment Gateway, and Status.
- Use the Search bar to quickly find payments by invoice number or client name.
- Click on the Filters option to refine the list based on Client, Project, or Payment Status.
Adding a Payment
To manually record a payment, follow these steps:
- Click on Add Payment.
- Select the relevant Project and Invoice.
- Enter the Paid On date and the Amount received.
- Choose the Currency and ensure the Exchange Rate is accurate.
- Enter the Transaction ID (if applicable) and select the Payment Gateway.
- Attach a Receipt if available.
- Optionally, add a Remark to provide additional payment details.
Click Save to confirm the payment entry.
Bulk Payments
For businesses handling multiple payments simultaneously, the Add Bulk Payment option simplifies the process.
- Click Add Bulk Payment.
- Filter invoices by Client to load all outstanding invoices.
- Select the appropriate Payment Method and Bank Account.
- Enter the Payment Date and Amount Received for each invoice.
- Provide the Transaction ID for reference.
- Click Save to apply the bulk payment.
This functionality ensures seamless tracking of multiple payments, improving financial management efficiency.
Credit Notes
Viewing Credit Notes
The Credit Note section provides a detailed list of all credit notes issued to clients. These notes act as adjustments or refunds for invoices, allowing for better financial tracking and reconciliation.
- Navigate to Finance > Credit Note to access the credit note list.
- The table displays important details such as Credit Note Number, Associated Invoice, Client Name, Total Amount, Adjustments, Used Credit, Remaining Credit, Date, and Status.
- Use the Search bar to locate specific credit notes by client name or invoice number.
- Click on Filters to refine results based on Client, Status, or Date Range.
Exporting Credit Notes
For record-keeping or reporting purposes, users can export credit notes in a structured format.
- Click on the Export button.
- The system generates a file containing all credit note details, which can be used for reconciliation and reporting.
Credit notes help manage refunds, adjustments, and customer account balances, ensuring accurate financial records.