

Employee Records & Roles
The HR (Human Resources) feature in Olqan is designed to streamline employee management and organizational structure. It consists of several key sections:
- Employees – Manage the workforce by adding, inviting, importing, and exporting employee data.
- Leaves – Track employee leave requests, approvals, and balances efficiently.
- Shift Roster – Schedule and manage employee shifts to optimize workforce availability.
- Attendance – Monitor employee check-ins, check-outs, and overall attendance records.
- Holiday – Maintain a list of company holidays and ensure alignment with employee schedules.
- Designation – Define and manage job roles within the organization.
- Department – Categorize employees based on departments, ensuring a structured hierarchy.
- Appreciation – Recognize and track employee achievements to foster a positive work environment.
Each section is designed to facilitate HR operations, ensuring efficient workforce management and organizational structure.
Employees
The Employees feature serves as a centralized location for managing employee records. It allows administrators to add, invite, import, and export employee data efficiently.
Key Features:
- Add Employee: Allows administrators to manually add a new employee to the system by entering details such as name, email, designation, and role.
- Invite Employee: Sends an invitation to a new employee via email, enabling them to join the system and set up their profile.
- Import: Facilitates bulk uploading of employee records using an XLS, XLSX, or CSV file. This is useful for onboarding multiple employees at once.
- Export: Generates an XLSX file containing the current list of employees, including their Employee ID, Name, Email, User Role, Reporting To, and Status. This feature helps in maintaining offline records or sharing data externally.
Administrators can also filter employees based on designation, department, and status, making it easy to locate specific employee records. The status indicator (such as “Active”) provides real-time visibility into employee availability.
Add Employee
The Add Employee feature allows administrators to manually register a new employee within the system by providing key details. The form is divided into two main sections: Account Details and Other Details.
Account Details
This section includes the essential information about the employee:
- Employee ID – A unique identifier assigned to the employee.
- Salutation – A dropdown field for selecting Mr., Ms., Dr., etc.
- Employee Name (Required) – The full name of the employee.
- Employee Email (Required) – The email address that will be used for login and official communication.
- Profile Picture – Allows uploading an employee’s profile image.
- Date of Birth – Select the employee’s date of birth.
- Designation – Assigns the employee to a specific job title.
- Department – Specifies the department in which the employee works.
- Country – Selects the employee’s country of residence.
- Mobile – Adds the employee’s contact number.
- Gender – Specifies the gender of the employee.
- Joining Date (Required) – The date the employee officially joins the company.
- Reporting To – Assigns a manager or supervisor for the employee.
- Language – Defines the preferred communication language.
- User Role – Determines the employee’s access level in the system.
- Address – Stores the employee’s home or office address.
- About – Provides a text area for additional employee information.
Other Details
This section includes optional settings and employment-related details:
- Login Allowed? – Enables or disables system login access for the employee.
- Receive Email Notifications? – Allows choosing whether the employee receives email updates.
- Hourly Rate – Specifies the hourly wage if applicable.
- Slack Member ID – Links the employee’s Slack account for communication.
- Skills – Allows listing skills such as “communication” or “ReactJS.”
- Probation End Date – Defines the end date of the employee’s probation period.
- Notice Period Start Date & End Date – Records the employee’s notice period duration.
- Marital Status – Indicates whether the employee is single, married, etc.
- Business Address (Required) – Specifies the official work location.
- Employment Type – Selects whether the employee is full-time, part-time, or contract-based.
Saving the Employee Record
Once all details are filled in, administrators can choose:
- Save – To add the employee and return to the list.
- Save & Add More – To save the employee and immediately add another one.
- Cancel – To exit the form without saving.
This feature ensures efficient employee onboarding, helping HR teams manage and organize workforce records seamlessly.
Inviting an Employee
Instead of manually adding employee details, you can invite employees via email or a link.
- Click “Invite Employee”.
- Choose one of the two options:
- Invite by Email: Enter the employee’s email address, add an optional message, and send an invitation.
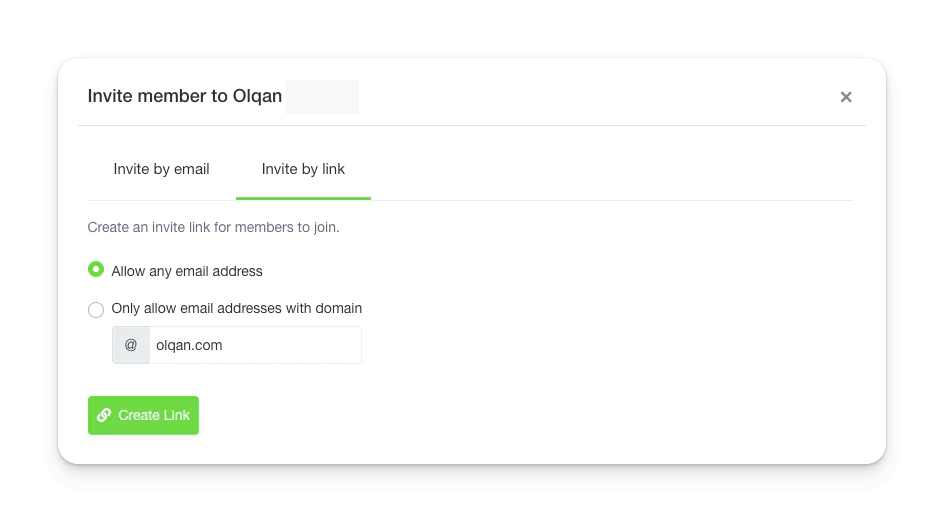
- Invite by Link: Generate a unique invite link that employees can use to join the organization.
- If using the invite link, you can choose to:
- Allow any email address.
- Restrict access to specific domains (e.g., only @company.com emails).
- Click “Send Invite” to complete the process.
Invited employees will receive an email or link to complete their profile setup.
Import Employee
The Import Employee feature allows users to bulk upload employee data into the system using an Excel or CSV file. This streamlines the process of adding multiple employees efficiently.
Uploading the Employee File
- Click “Import” in the Employees section.
- Select an Excel (.xls, .xlsx) or CSV (.csv) file containing the employee data.
- Ensure that the date format follows the system’s requirement (Y-m-d, e.g., 2025-02-01).
- If the uploaded file contains a header row, enable the “File Contains Headings Row” toggle.
- Click “Upload and Move to Next Step” to proceed.
Matching Employee Data
Once the file is uploaded, the system will display the imported data and prompt users to match the columns to the corresponding system fields:
- Required Fields (must be matched):
- Employee Name
- Employee Email
- Employee ID
- Joining Date
- Optional Fields (can be skipped or matched as needed):
- Mobile
- Gender
- Address
- Hourly Rate
If a column is incorrectly mapped or missing, click “Edit” to correct the mapping.
Finalizing the Import
- Once all required fields are matched, a “Well Done!” message appears, confirming successful mapping.
- Click “Submit” to finalize the import.
- The system processes the data and adds the employees to the organization.
Import Completion
- After successful processing, a confirmation message appears indicating the number of entries processed.
- Click “Back to Employees” to return to the Employee list.
This feature simplifies adding multiple employees, ensuring accurate and efficient onboarding.
Export
The Export Employee feature allows users to download employee records in an Excel (.xlsx) format for reporting, backup, or data analysis purposes.
Steps to Export Employees
- Navigate to the Employees section in the HR feature.
- Click the “Export” button.
- The system will automatically generate and download an .xlsx file containing the employee details including:
- Employee ID
- Name
- User Role
- Reporting To
- Status (Active, Inactive, etc.)
Use Cases for Export
- Data Backup: Keep an offline copy of employee records.
- Reporting: Analyze workforce data externally.
- Sharing Data: Provide HR insights to other departments.
This feature ensures that users can quickly retrieve and utilize employee information in a structured format.
Roles & Permissions
The Roles & Permissions feature allows administrators to manage user roles and define their permissions within the system.
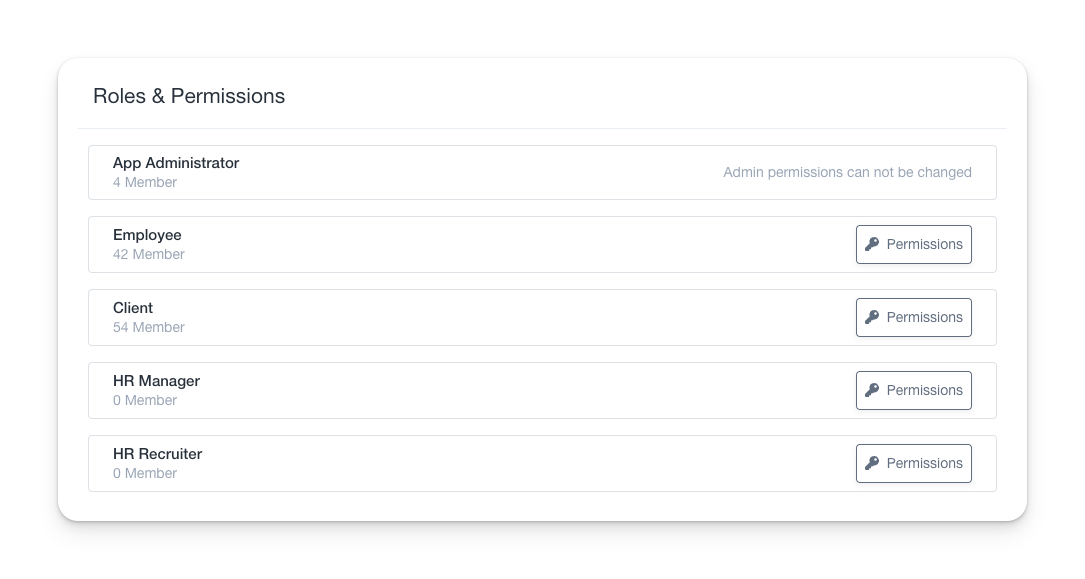
Managing Roles
- Click Manage Role to create or modify roles.
- Default roles like App Administrator, Employee, and Client cannot be deleted.
- New roles can be added by entering a Role Name and selecting an existing role to import permissions from.
Assigning Permissions
- Each role has assigned permissions that determine access to different features.
- Click Permissions next to a role to view or modify permissions.
- Permissions can be set to:
- None – No access to the feature.
- View – Read-only access.
- Add – Ability to create new records.
- Update – Ability to edit existing records.
- Delete – Ability to remove records.
Reset and Delete Roles
- Default roles cannot be deleted but can have permissions reset using the Reset Permissions option.
- Custom roles can be removed by clicking Delete.
This section ensures controlled access to various system feature based on user roles.


